


Why Choose Canada for Higher Studies?
Before diving into the technical steps, let’s understand why Canada is one of the most popular destinations for international students:
- Top-Ranked Universities: Institutions like the University of Toronto, McGill University, and UBC consistently rank among the world’s best.
- Affordable Education: Compared to countries like the USA and UK, Canada offers relatively lower tuition and living costs.
- Welcoming Immigration Policy: Canada encourages skilled graduates to stay and work through post-study work permits and PR pathways.
- Cultural Diversity: Students from over 200 nationalities study in Canada, making it a true multicultural hub.
A Closer Look at the SDS vs. Non-SDS Visa Streams
Canada offers two main routes for study permit processing:
Student Direct Stream (SDS)
- Fast-track processing (within 20 days)
- Open only to residents of certain countries (including India)
- Requires upfront payment of first-year tuition and a GIC of CAD 10,000
- IELTS score of 6.0 in each band is mandatory
Non-SDS (Regular Stream)
- Available to students globally
- Longer processing time (up to 2–3 months)
- More documentation needed (bank statements, property valuation, etc.)
If you’re eligible, SDS is always the better option due to its speed and higher approval rates.
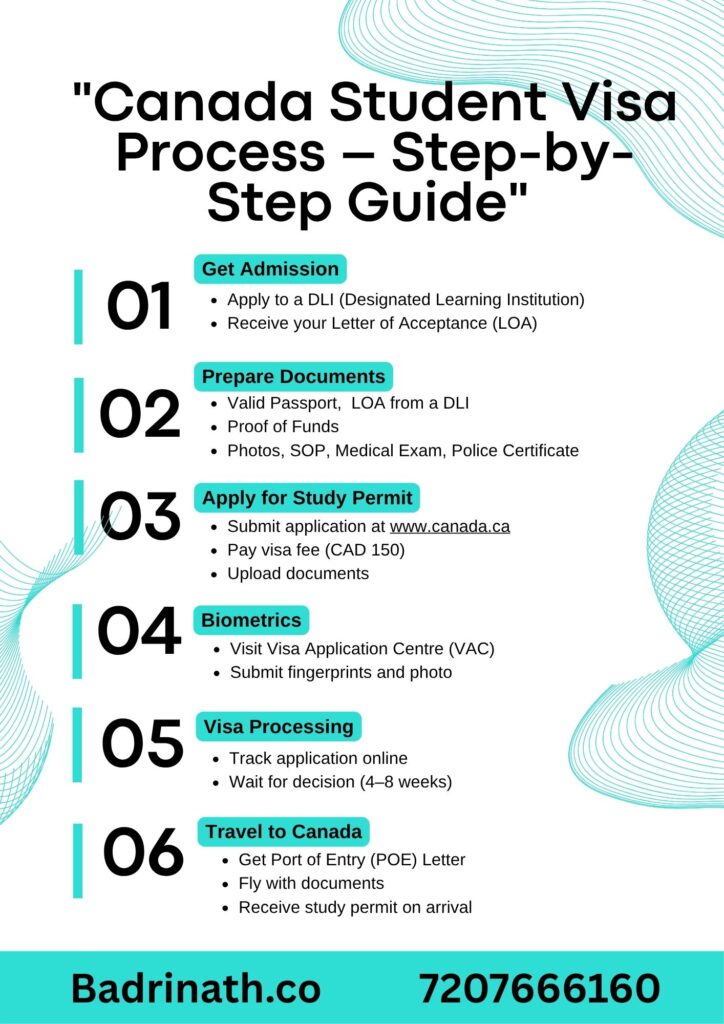
Step-by-Step Breakdown of the Application
Let’s now expand on each step for better clarity.
1: Choosing the Right Course and University
It’s critical that your course:
- Aligns with your previous education or career goals
- Is offered by a Designated Learning Institution (DLI)
- Has clear career prospects post-graduation
Pro Tip: Use EduCanada or individual university websites to filter courses by province, fees, and duration.
2: Secure a Letter of Acceptance (LOA)
Your LOA should include:
- Official letterhead
- DLI number
- Start and end dates
- Tuition fees
- Mode of study (online, in-person, or hybrid)
Universities often issue the LOA after a non-refundable deposit is paid.
3: Confirm Eligibility
Eligibility doesn’t just stop at academics and finances. It includes:
- A clean criminal record
- Good health (you may be asked for a medical examination)
- Clear intent to return to your home country after the course
Note: Canada doesn’t officially require a minimum academic percentage, but most institutions expect 60–70% and above.
4: Financial Documents in Detail
For SDS:
- GIC receipt (CAD 10,000) from banks like ScotiaBank or ICICI Canada
- First-year tuition fee receipt
- IELTS TRF with 6.0 in each module
For Non-SDS:
- Last 4–6 months of bank statements
- CA evaluation of assets
- Affidavit of support from sponsors (parents, spouse, etc.)
5: Language Proficiency Tests
Even if your university waives off English test requirements, IRCC requires proof for visa purposes. IELTS Academic is widely accepted.
Recommended scores:
- Undergraduate Programs: IELTS 6.0 overall
- Postgraduate Programs: IELTS 6.5–7.0
- TOEFL equivalents are also accepted in most cases.
6: Submit Your Study Permit Application Online
On IRCC’s official portal:
- Fill out IMM 1294 (Study Permit form)
- Upload your passport, LOA, SOP, and financial proof
- Submit family information form IMM 5645 if applicable
Important: Ensure all uploads are in PDF format and legible. IRCC rejects unclear or incomplete files.
7: Pay Fees
You’ll pay:
- CAD 150 for application
- CAD 85 for biometrics
- Total = CAD 235 (approx. ₹14,000 INR)
Use a credit/debit card with international access.
8: Attend Biometrics and Medical Exam
After fee payment, you’ll get a Biometric Instruction Letter (BIL). Book an appointment at a VFS Global center. IRCC stores your biometrics for 10 years.
For medicals:
- Visit a panel physician approved by IRCC
- Results are directly sent to IRCC
9: Wait for Approval
Processing Time:
- SDS: ~20 calendar days
- Non-SDS: 4–8 weeks
If approved, you’ll receive:
- Letter of Introduction (bring this while traveling)
- TRV (visa stamp on your passport) or eTA (for air travel only)
10: Port of Entry (POE) in Canada
At immigration, show:
- Passport
- LOA
- GIC & Fee Payment Receipts
- POE Letter
- COVID-19 vaccination documents (if still applicable)
You’ll receive your Study Permit document at the airport, so keep all originals handy.
What Happens After You Arrive?
- Apply for your SIN (Social Insurance Number)
- Open a local bank account
- Update your address with the college and IRCC
- Attend orientation and complete course registration

Scholarships and Financial Aid Tips
- Apply for entrance scholarships while applying to universities
- Some provinces offer bursaries and on-campus jobs
- Join college groups and community boards to find part-time opportunities
Mistakes to Avoid
- Submitting unclear SOP or weak financial documentation
- Providing false information on funds or academics
- Not responding to IRCC emails promptly
Pro Tip: Always review your application with a certified immigration consultant or through your university’s international support office.
Final Thoughts
The Canada Student Visa process may seem intense, but it’s very systematic. With the right preparation, documents, and attitude, you can confidently walk into your dream Canadian university. Start early, stay organized, and always be honest in your application — and you’ll be well on your way to success in Canada!
External Links:
How to apply for Canada student visa?
Canada Student Visa Process from India (2025)
Internal Links:
Step-by-Step Guide to Student Visas: UK, USA, Canada & Australia
Study in Canada for International Students – Everything You Need to Know